Step-By-Step Shopify Tutorial for Beginners
Amy 09 Feb 2022 06:42EN
Shopify is one of the easiest platforms to build an online store and it is friendly for new users. In this article, we will discuss how to set up Shopify stores and complete Shopify user guide.
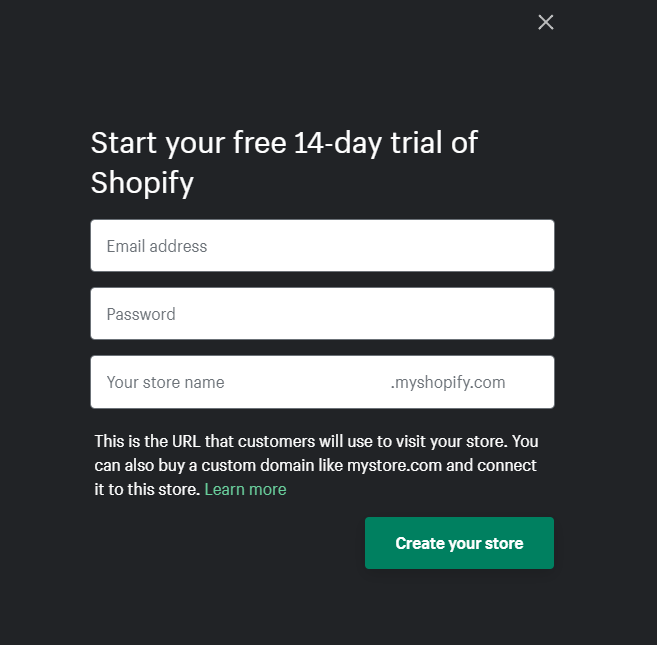
Here enter your email address, password, and store name. Shopify will generate your store URL according to your store name, you can change it later if you have not decided the store name. Also, you can purchase a custom domain and connect it to this new store.
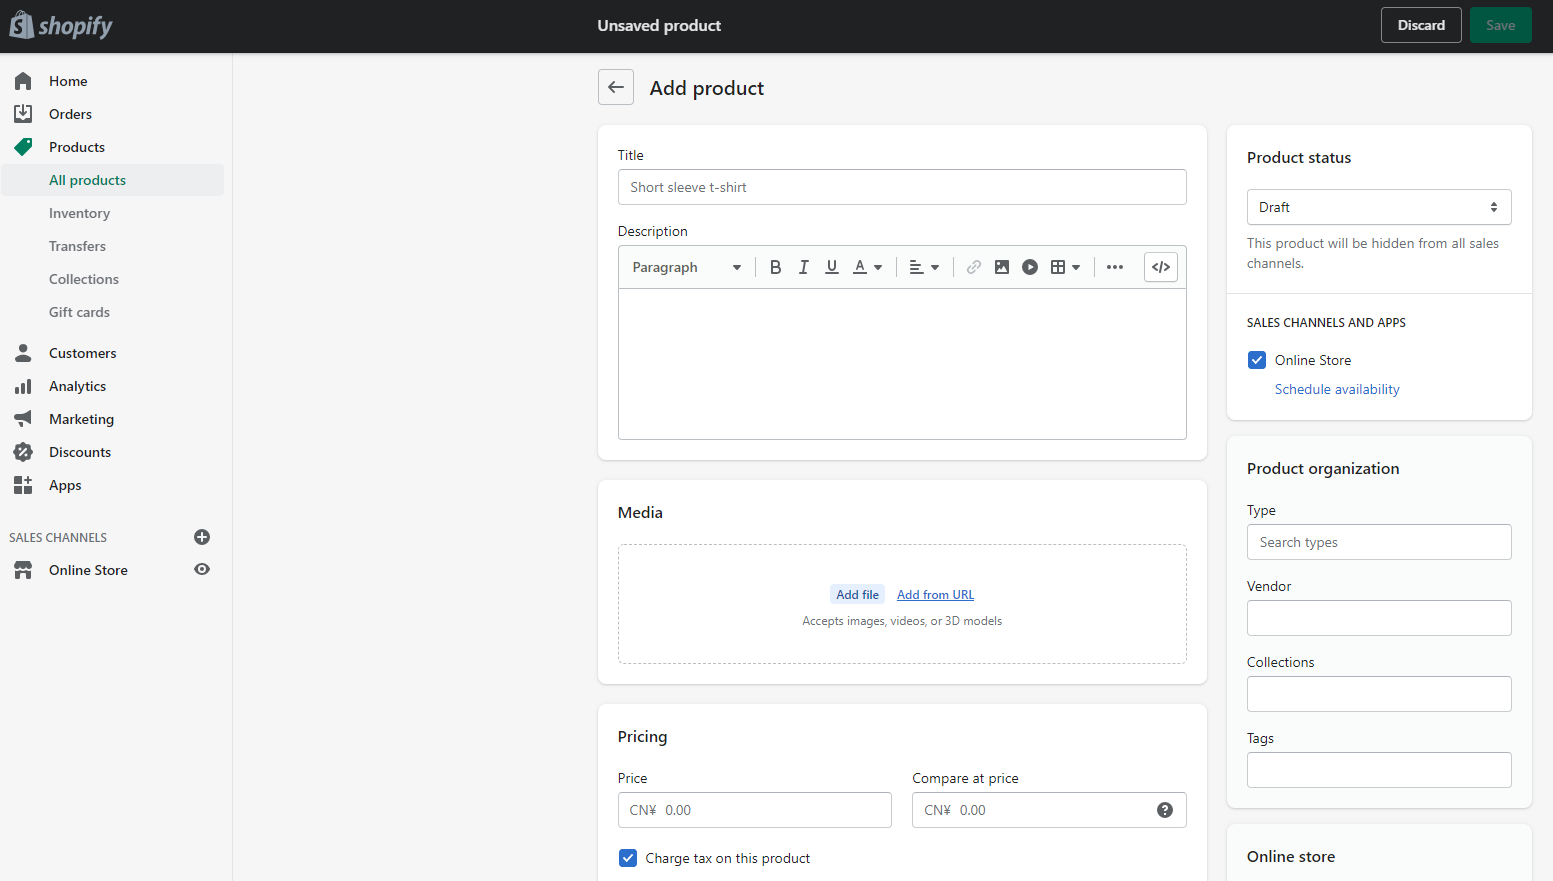
To add a new product, you need to enter all required info. The first thing you need to enter is the product title and description. You can talk about the product benefits in description. Next you can upload images, videos, or 3D models to show your products, also the pricing, inventory, and provide shipping methods to your customers.
To get more views and exposure, keeping SEO in mind. Under Search engine listing preview section, you can add a title and description to see how this product might appear in a search engine listing.
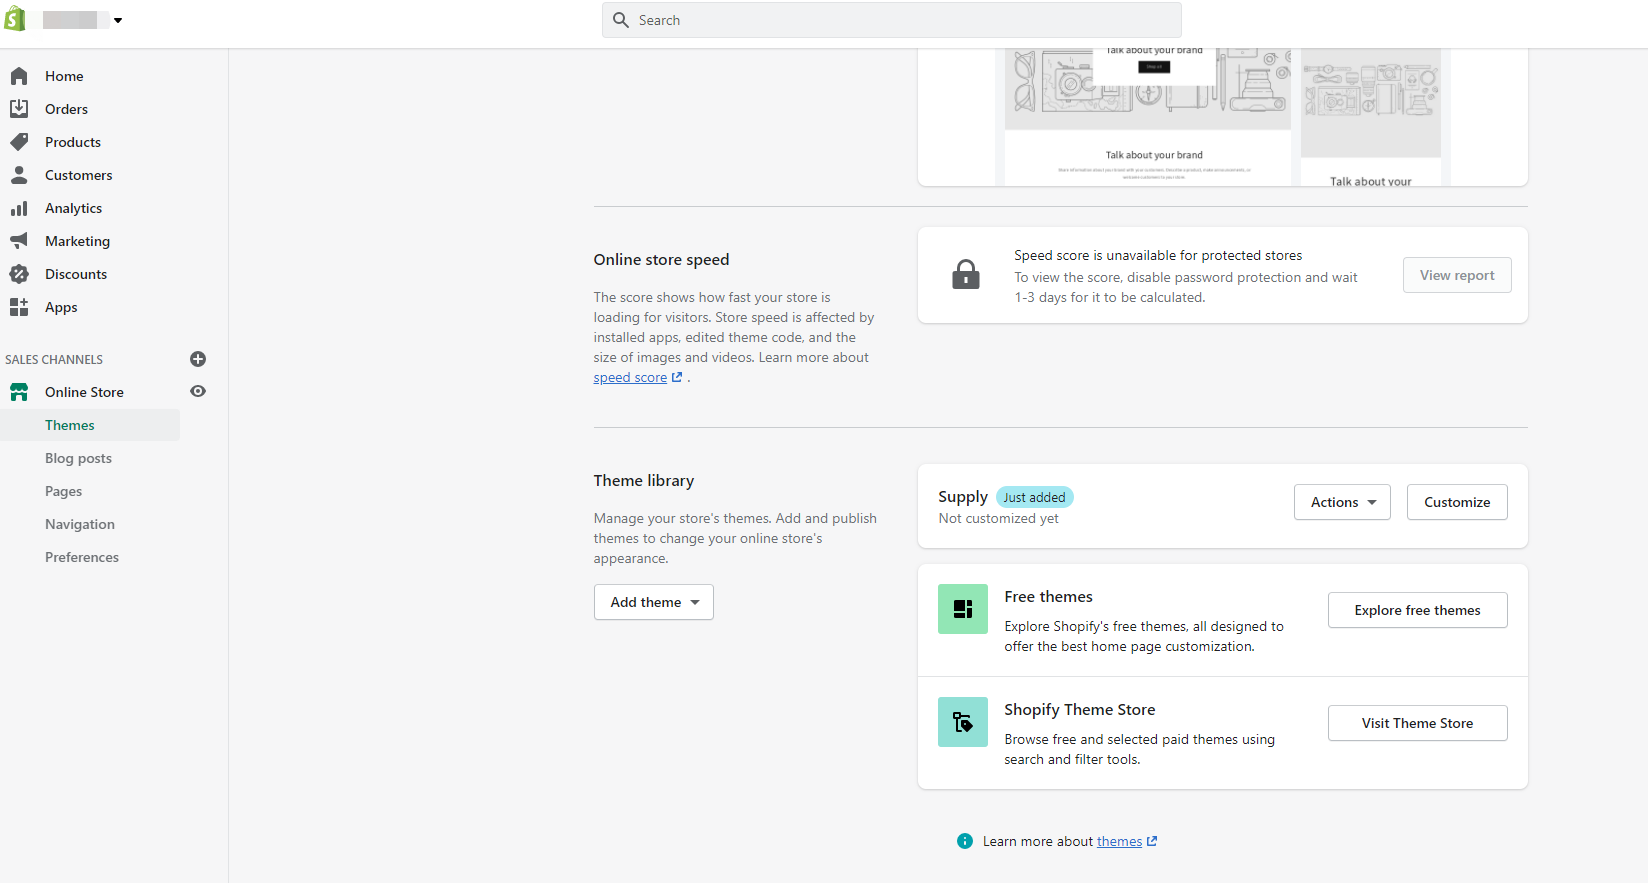
You’ll find that there is a default theme in your store, then you can browse and select another free or paid theme in Shopify Theme Store. You can use the search and filter option to find the right theme for your store. You can add multiple themes to your Shopify account, test and preview your stores, finally publish one theme to your online store.
To customize your own theme, you can add banner, rich text, featured collection, collage, video, and footer to show your store to your customers.
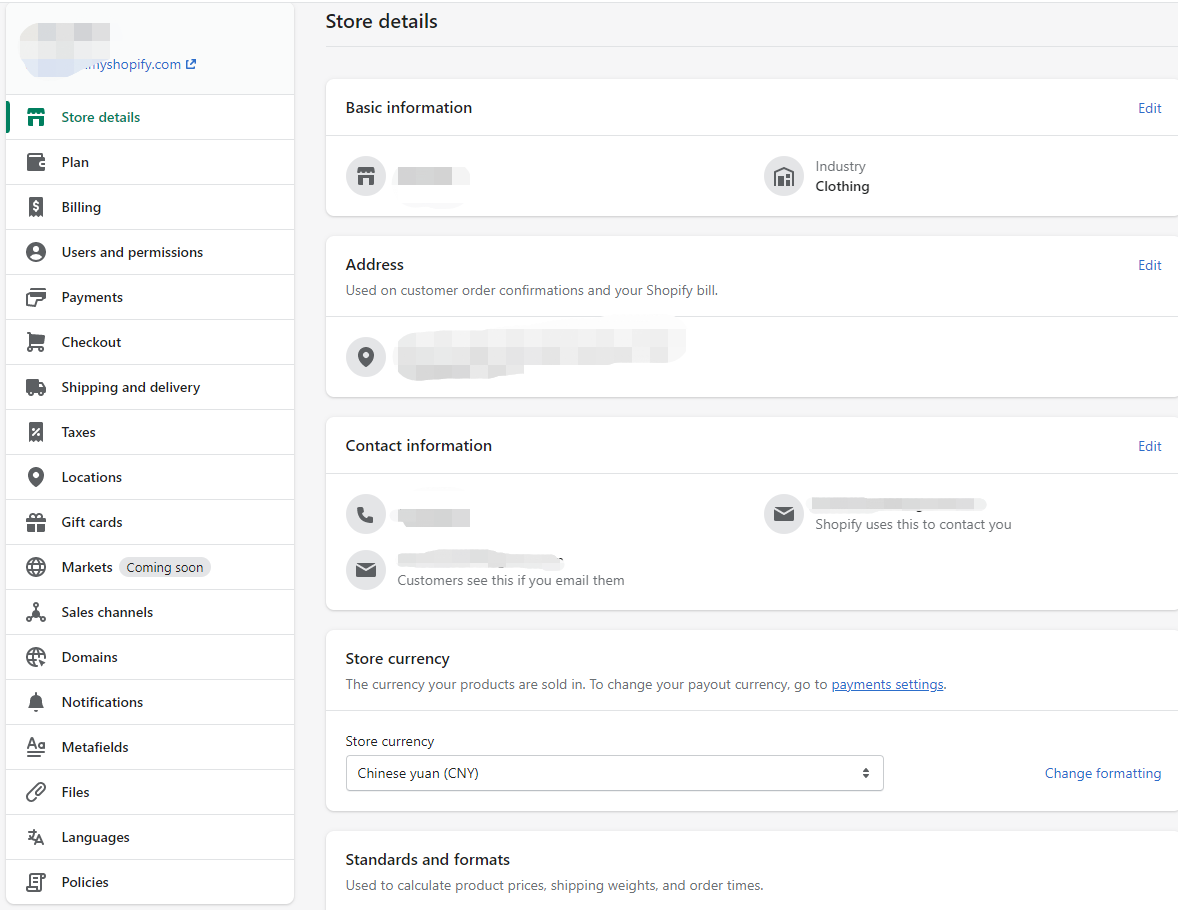
In Shopify settings, you can set up general store details, shipings, payments, checkout, etc. Here I will show some examples.
1. Payments: After you set up payments, your customers can make credit card payments at your store. You can activate Shopify Payments from the payments page in the Shopify settings.
2. Checkout: Under checkout settings, you can choose where you accept orders and whether your checkout needs extra information from your customers.
3. Shipping and delivery: You need to decide which delivery method in your store and your customers can choose one of the methods at checkout. For shipping zones and shipping rates, you can take the shipping cost into consideration.
You can go to Settings > Payments, and enable Bogus Gateway (for testing) payment provider.
After that, you can visit your store and place an order just like an ordinary customer. Through the test orders, you can check if the funds transfer is complete by using an actual credit. Then you will find if you can start to take real orders.
You can contain your brand to your domain name, it helps a lot for brand recall in your customers’ minds and rank better in search. You can buy a new domain from Shopify or other websites. If you already own a domain you can connect this existing domain to Shopify.
1. Sign up for Shopify's free 14-day trial
Go to the Shopify page and sign up for a new account. You don’t need to pay anything, Shopify offers a free 14-day trial that you can get started and experience the platform before paying the subscription fee.Here enter your email address, password, and store name. Shopify will generate your store URL according to your store name, you can change it later if you have not decided the store name. Also, you can purchase a custom domain and connect it to this new store.

2. Fill in required info
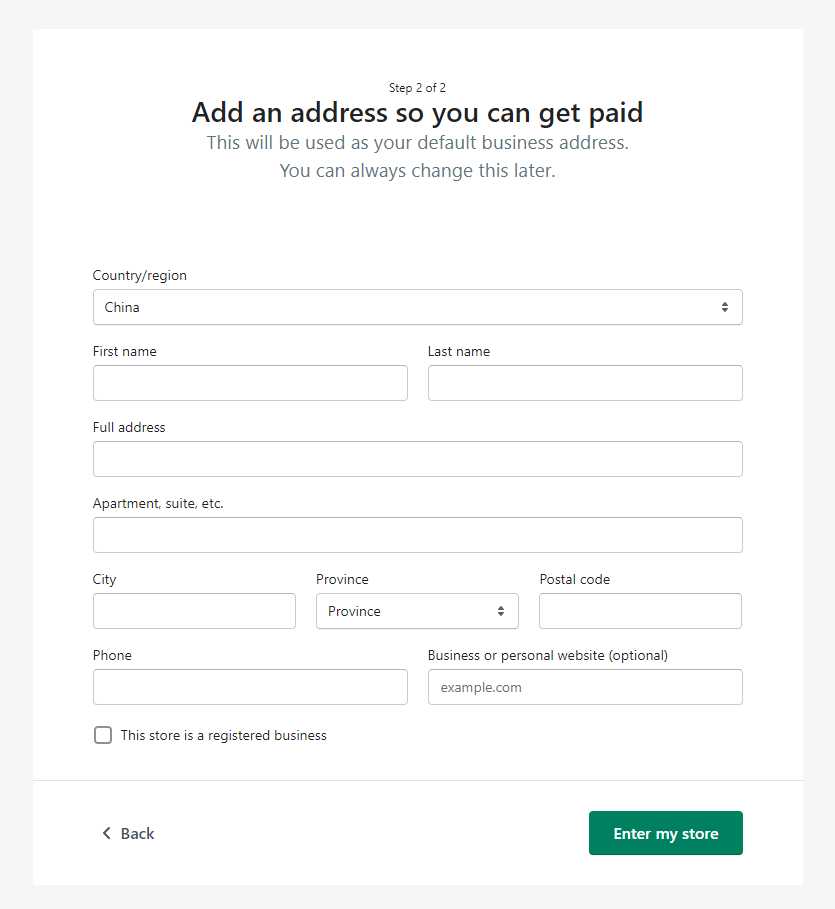
Next you are required to fill in some details about yourself. And add an address you can get paid, this will be used as your default business address. After clicking the Enter my store button, you can see that you have entered the Shopify admin page.
3. Add your first product
After your first login, adding products should be one of the first things you need to do. You can go to Products to add your first product to your store.
To add a new product, you need to enter all required info. The first thing you need to enter is the product title and description. You can talk about the product benefits in description. Next you can upload images, videos, or 3D models to show your products, also the pricing, inventory, and provide shipping methods to your customers.
To get more views and exposure, keeping SEO in mind. Under Search engine listing preview section, you can add a title and description to see how this product might appear in a search engine listing.
4. Customize your theme
You can find the right theme for your business, just go to Online Store > Themes.
You’ll find that there is a default theme in your store, then you can browse and select another free or paid theme in Shopify Theme Store. You can use the search and filter option to find the right theme for your store. You can add multiple themes to your Shopify account, test and preview your stores, finally publish one theme to your online store.
To customize your own theme, you can add banner, rich text, featured collection, collage, video, and footer to show your store to your customers.
5. Configure settings
Before you go live with your store, there are some default settings to change. Let’s go to Shopify Settings.
In Shopify settings, you can set up general store details, shipings, payments, checkout, etc. Here I will show some examples.
1. Payments: After you set up payments, your customers can make credit card payments at your store. You can activate Shopify Payments from the payments page in the Shopify settings.
2. Checkout: Under checkout settings, you can choose where you accept orders and whether your checkout needs extra information from your customers.
3. Shipping and delivery: You need to decide which delivery method in your store and your customers can choose one of the methods at checkout. For shipping zones and shipping rates, you can take the shipping cost into consideration.
6. Test your store
After all settings, you can test your store before you start to take orders. You can test that your checkout process, order process, inventory, shipping are all working as your settings.You can go to Settings > Payments, and enable Bogus Gateway (for testing) payment provider.
After that, you can visit your store and place an order just like an ordinary customer. Through the test orders, you can check if the funds transfer is complete by using an actual credit. Then you will find if you can start to take real orders.
7. Add a custom domain name
There is another step to launch your store - adding your domain to Shopify. There is a default domain assigned by Shopify, www.storename.myshopify.com. But you may want a customized store domain, for example www.storename.com.You can contain your brand to your domain name, it helps a lot for brand recall in your customers’ minds and rank better in search. You can buy a new domain from Shopify or other websites. If you already own a domain you can connect this existing domain to Shopify.
Conclusion
Shopify offers a great value with multiple tools you need for online selling and provides pricing plans to scale a business and move it from startup to growing enterprise. I hope this guide can help you to startup your online selling business on Shopify.Sync Inventory
Want to prevent overselling when you manage multiple stores? Just use BigSeller sync inventory feature, it will deduct stock from B store if you get orders in A store.


